Wednesday, November 15, 2017

The Fall Garden


I love fall gardening. Summer gardening is the type of gardening that bursts at the seams, and there is a constant flurry of activity to keep up with all of the picking, weeding, and preserving that comes with it. It is demanding and hot, the weeds come up faster than you can pick them, and there is no shortage of bugs ready to chow down on all of your hard work. And while I love our summer garden bursting with gorgeous produce, I also love when the days cool down, the hard labor is done, and gardening takes on a slower, more relaxed pace.

There’s also something pretty darn satisfying about plucking carrots out of the ground on Thanksgiving day and picking hardy winter greens, like kale, when the ground is covered in a blanket of snow! 

Carrots can be a pain to start in July so they're ready in the fall, but it's worth it! They can stay in the ground even when it's cold outside and can be harvested throughout the winter as needed, which comes in handy if you don't have a root cellar!


These turnip greens are known as run-up turnips in the south and they are the bomb! The greens can be harvested throughout the fall and winter, but the amazing thing is that you can overwinter them and they will produce one last picking of sweet, tender greens in early spring.


Nothing is worse than when a hard frost destroys our greens, and I go to the store to purchase them and am stopped dead in my tracks every time I see their outrageous price tag. Luckily not only is kale a superfood in the health world, but it's a superstar in the garden too... When everything else is dead and frozen, this stuff can take the hard frosts and snow, and due to the cold temps converting its starches to sugar, the bitter flavor mellows out too!


There are a few different cold hardy lettuces, like this red oak leaf lettuce. It holds up pretty well when the night temps dip down but the days warm up. You want to pick it mid-day when the frost has melted off of it, otherwise it makes for a soggy salad. Once our daily temp stays hunkered around freezing, it won't be good any more, so we're eating it up now!


Beets are a beautiful root vegetable for the fall garden that add an earthy flavor to fall dishes.


One of my favorite things to grow are beans. I could get on a soapbox proclaiming all the virtues of dry beans, but I'll save that for another post! I start dry beans in July and harvest them in the fall. Dry beans are the staple of several winter dishes at our dinner table, they store well, and anything we don't eat (or decide to save) can be planted the next summer.


We tuck in our fall plants at night under coverings to protect them from hard frosts.


Sometimes we forget and they get covered in ice.


Whoops!


A gentle spray of water helps to melt the ice.


This kale looks as good as new!

Happy gardening!


Wednesday, August 9, 2017

Farmer's Market Hobo Packs

When I was a kid, one of my favorite weeks every summer was when my mom loaded all six of us girls into our red suburban, Ida Red, and made the long trek to Lincoln State Park in Indiana to camp with my grandparents and cousins.

My sisters, my cousins, and I loved to run the trail around the lake and climb the fire tower. We counted every step and stared out over the trees to see if we could spot a real forest fire. Good thing we never did!

We always visited Lincoln’s boyhood home, swam in the lake, were forced to watch the play about Abe Lincoln because it was educational, and looked forward to seeing musicals, like Oklahoma and The Music Man in the amphitheater. And then, after a long day of fun-filled activities, came the evenings spent around the campfire, telling stories and cooking the most delicious food. We ate the normal camp fare of hot dogs and s’mores, but it was tradition to make hobo packs with my grandparents, something they did with their own kids and with the boy scout and campfire girl troops they used to lead.

During the summer, my mom would often make these on the grill for a quick and easy meal with vegetables from our large garden. She’d hand each of us our own square of tinfoil… and believe me, when you are the oldest of six girls, your own square of anything is practically a miracle. Nothing was off limits to my little sisters; my bed, my favorite clothes, my books, my diary… even my toothbrush! So to have my own foil packet, where I could pick my own vegetables, was a pretty big deal. My mom always gave us a permanent marker to write our names across the top of the packets before we stuck them on the grill or campfire (a lesson learned one day after a huge fight about whose foil packet was whose).

A hobo pack is a Boy Scout camping staple, created with large squares of tinfoil shaped into a packet. It’s normally stuffed with some sort of meat and veggies, sealed, and placed over a campfire to cook. It's an excellent way to use up veggies and the clean-up is ridiculously easy. You just roll up the tinfoil and toss it (or if you live in a family with six kids or a frugal grandmother, you clean it and save it for next time).
I make all kinds of versions of these throughout the summer, but this one is similar to the one from my childhood. These proportions will make four hobo packs.

Ingredients:
1 lb. smoked sausage chopped into thick chunks

2 ears of corn cut into 2 inch rounds

1 lb. baby potatoes (or four medium sized potatoes sliced thinly)

1 small onion, sliced thinly

1 small pepper, sliced thinly

1 small zucchini, sliced thinly

4 cloves of garlic, smashed

2 teaspoons salt

2 teaspoons of pepper

4 tablespoons of butter

Splash of white wine


You can see from the picture above that we also threw in some beans, tomatoes, and mushrooms. The best thing about these packets is that it's a great way to use up all those extra veggies from the garden or market!


Fold your four squares of tinfoil into pockets or squares and spray with cooking spray.  Divide and layer the meat and veggies between the four packets . If you are using potatoes, you can microwave them for five minutes or parboil them to make sure they are cooked through when you eat them.


Sprinkle the meat and veggies with salt, pepper, and any other of your favorite seasonings. I added fresh tarragon to these ones. Finish it with a drizzle of olive oil or a pat of butter, and for the grown-ups I love to add a splash of white wine. Seal the sides up, write your name on top to be sure you don’t have a major family fight, and put it on the grill over medium/high heat for about 20 minutes.


We eat ours straight from the steaming foil with chunks of flatbread to soak up the juices!
Chowabunga!

Friday, July 7, 2017

Giving Tomatoes Room to Breathe

When the summer heat wears off for the day, I get a lot of peace from trimming tomatoes. It has that Mr. Miyagi feel to it, like when he is trimming Bonsai trees in The Karate Kid. However, trimming tomatoes just isn't for relaxing, tomatoes tend to be a plant that bush out quickly, and it does a lot of good to prune them back.


These tomatoes pretty bushy, and if you look closely, you can see that the leaves are starting to yellow at the bottom.


I took quite a few leaves off of them!


Either they needed a lot of trimming, or I just needed a lot of peace...ha!


These are healthy and vibrant tomatoes from our 2016 garden.


If you take a close look at those tomatoes, you can see they aren't quite as healthy and vibrant as they seemed to be. The leaves are starting to get diseased because they are so thick and bushy that they don't have "room to breathe", or as most gardeners would say, they don't have enough air circulation. If they aren't taken care of, the plant can go from looking vibrant to shriveled in a matter of days.


Freshly trimmed tomatoes may look a little bare, but the extra air circulation from the pruned plants will produce a gorgeous, disease free crop of tomatoes.

When I'm trimming tomatoes, I can't help but think of my own life and how much my family and I need room to breathe. I tend to be a volunteer-for-everything type of person, and before I know it, our lives are a tangled mess of too many activities, and we can go from thriving to barely surviving pretty quickly.

You'd think trimming out activities would make life feel pretty bare, but it opens up space and growth for important things, like building memories in the backyard, catching fireflies and playing Frisbee. Trimming back for us means standing around the grill, savoring the smell of smoky chicken and telling stories, or sitting on the old swing watching the sun go down. Abundance in life doesn't necessarily come from filling every nook and cranny with activities, but from being able to savor the things that truly matter, and sometimes to truly enjoy those things, you've got to be willing to trim some things out and give yourself a chance to breathe.

Monday, June 26, 2017

Bok Choy Harvest

If there is any green you should grow, it's baby bok choy! It's easy to grow, slow to bolt in hot weather, has awesome health benefits and it tastes delicious.


I use bok choy in pretty much everything. We harvest young greens for salad, but I also use them like I would baby spinach in egg dishes and soups. They are fantastic sautéed with garlic, crushed red pepper flakes, sesame oil, and soy sauce as a side dish, and they add great flavor and crunch to stir-fry.

Photo credit- Dessie Austin
We grow multiple beds of bok choy every summer. It's a super quick growing veggie, so you can get it in and out of garden beds in no time at all. We normally plant a bed in early spring, another bed after a spring veggie is done and before we get a summer veggie in, and a bed for our fall garden. 


To plant bok choy, you simply scatter the seeds in the bed and keep them moist. We saved these seeds from a few of our bok choy plants from our 2016 garden.

Photo credit- Dessie Austin

To harvest the bok choy, you cut it with sharp shears or a knife.

Photo credit- Dessie Austin

We plunge it into cold water to cool it down and keep it from wilting. If you plunge it in water and dry it well, it will keep in plastic bags in the fridge for 2-3 weeks.


The baby leaves are tender and great for salads, but you can also let them grow and harvest the heads. They are excellent in Asian dishes because the stalks add a nice crunch to stir-fry and noodle bowls.

Photo credit- Dessie Austin

Bok choy is considered a nutrient dense plant, containing large amounts of Vitamins A and C, antioxidants, glucosinolates, which have been shown to fight cancerous cells, and minerals like calcium, manganese, and iron. 


 So if you are wondering what to plant next or looking for something new to try, put this one on the list! You'll love it!

Tuesday, June 13, 2017

Coffee And Blueberries

About a year ago, we had a coffee fairy start showing up at our house. We'd head outside to be greeted by a tub of coffee grounds sitting in front of our garden gate. They say coffee grounds are good for blueberries, so we started putting the grounds around our blueberry bushes.


We have four blueberry bushes, and I guess even we have a little bit of laziness to us, because for the last year we have been spreading the coffee grounds around the two blueberry bushes closest to the garden gate.

Blueberry bush #1

Blueberry bush #2

Blueberry bush #3

Blueberry bush #4

(If you can't see blueberry bush #4, it's because it doesn't exist anymore)

We do a lot of experimenting in our garden, but this was by accident. We naturally spread the coffee grounds over the two bushes closest to the gate, bushes #1 and #2, and a year later they have grown and are bearing a nice crop of blueberries! Bushes #3 and #4 did not receive the coffee grounds, and as you can see from above, we lost blueberry bush #4, and #3 is quite a bit smaller than the first two!

This spring we started walking the few extra feet to give the third blueberry bush some coffee grounds and it is starting to look better already!


Not only does your morning coffee give you your daily energy, but it gives your blueberry bushes energy too! And it's a great use for those leftover coffee grounds, so feed them to your blueberries!


Tuesday, April 18, 2017

Starting Seeds With A Soil Blocker

April is National Gardening Month and there's still plenty of time to start your own seeds if you plan to put in a garden this summer!

We like to think of ourselves as "dirt-cheap" gardeners, and starting your own seeds is a great way to save big bucks in the garden.

An average packet of seeds cost around $2-$3, while one 6 inch tall plant can cost  at least $3-$4. If you DIY it, you can get thirty plants for the price of one! Who doesn't want that sort of savings?

As Rachel Ray would say, "Don't pay someone else to do something you can do!"

Start your own seeds!

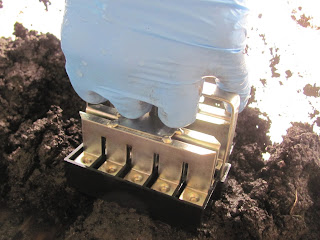
We've tried all sorts of ways to start seeds and we have been most successful with a tool called a soil blocker. Basically, you mix together your seed starting mixture and use this tool to stamp out blocks of soil to plant your seeds in.


These blocks are easy to plant in, easy to keep watered, and easy to transplant.

When we used to transplant our seedlings into the garden, we always planned on losing several plants from the transplant process, which can be rough on the plants. With the soil blocker, the roots grow to the edge of the blocks, and keep growing into the soil once they are in the ground. There's no transplant shock, no root-bound plants and no thick material the roots have to try and grow through!

Over the last couple of years, we've invested in a 2 inch soil blocker, which makes 2 inch blocks, and a micro soil blocker that makes 3/4 inch blocks.


The large soil blocker is ideal for starting larger seeds, like squash, marigolds, and even corn!


The micro soil blocker is awesome for planting large quantities of small seeds. We usually start around 60 tomatoes, so the micro blocks save a ton space compared to the 2 inch blocks.


To make the mixture for soil blocks you will need; 2 parts of peat moss, to one part compost, and one part perlite. You add in enough water so the mixture holds together. To test this, use your hands to pack the mixture into a ball. It should hold together like a snowball; it should be moist, but not so moist that it won't hold its shape. If it's too crumbly, add a little more water. If it's too wet to hold together, add a little more peat moss. (You can also add a handful of fertilizer to the mixture if you wish)


Stamp out the soil blocks.


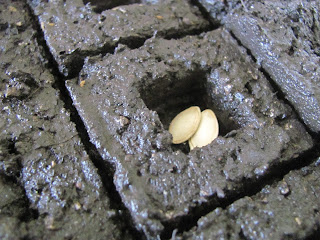
Plant your seeds.

To keep the soil blocks moist, we store them in assorted plastic and foil containers, and pour water into the bottom of the containers for the blocks to soak up.


Once the seeds sprout we place them under grow lights, and once they're large enough, we transplant them into the garden!


It's super easy and, after the initial investment of the soil blockers, it's an extremely cost effective way to grow your own plants! Happy gardening!