Wednesday, August 31, 2016

Accidental Vegetarians

If you would have told me a year ago that our family would be eating vegetarian meals on a regular basis, you would have gotten an eyebrow raise from me. But this past February, the unthinkable happened... for the first time in our eleven years of marriage, we ran out of venison.

We couldn't adjust our grocery budget to accommodate for not having the amount of venison that we usually have in the freezer, so we had to adjust our meals... and we became accidental vegetarians, or since we still eat some meat, I guess we technically became flexitarians.

To say I was not excited is an understatement. To me it seemed like our meal options were limited, like one of those math problems where you have one blue marble, one red marble, and one yellow marble, and you have to see how many combinations can you make. Our menu consisted of rice, beans, and veggies on Tuesday, veggies, beans, and rice on Friday, and beans, rice, and veggies on Sunday. It didn't matter what order I put it in, we still had the same food sitting on our plates (and after a week, my family didn't think my math joke about making different combinations was very funny.)

Finally I realized our new accidental vegetarian lifestyle would only be boring if I let it be boring. As I started to read cookbooks, blogs, and magazines for ideas, I found that the vegetarian lifestyle was not as boring, lifeless, and unfulfilling as I thought it would be. It was an adventure trying new recipes and shockingly enough, even my meat-loving husband was enjoying the meals! Plus, it was a great way to put all of the veggies from our large garden to use!

Here are some of our favorites-


The "no-cook" Asian noodle bowl is fast to fix, chock full of veggies, and cures our cravings for Chinese takeout. James and I love it for lunch, but the kids would still rather have PB&J.


Roasted poblano, corn, and zucchini lasagna is a great way to utilize all those veggies from the garden. I was the most worried about winning over the family with this one, but it is one of their favorites!


Vegetable kebobs with rice and beans, and a mojo sauce is one of those "rice, bean, and veggie combinations", but it's super delicious, especially with the tangy mojo sauce. Just don't make it for every single meal!

Friday, July 29, 2016

A Garden That Heals

I have a lot of favorite books, but one of the books that I have to read every year is The Secret Garden by Frances Hodgson Burnett. I love how she uses the garden to heal the family, and as the garden flourishes, the characters flourish too.

Some people see our garden and think we're awesome, and some people see it and think we're crazy! Our white farmhouse is 1100 square feet and our garden is 2400 square feet, so maybe that does make a little nuts, but we are crazy about gardening because it's played a large role in healing our family too.

Gardening in the rain

We moved into our house in 2011, threadbare from the hardships of life. James was working sixty hours a week, taking care of me, and trying to keep up with the house. I was recovering from a surgery to remove a tumor from my lungs, battling a lung infection and nerve damage, and couldn't do the simplest of things, like brush my hair. Our kids were traumatized from all of my time in the hospital and struggling with separation anxiety disorder at school, worried that they'd come home and I wouldn't be there any longer.

I started the garden because I wanted something to do while James was working and the kids were at school. I wanted affordable organic food with no chemicals in it (doctors mentioned the cancer could have come from the chemicals used on the orchards surrounding my childhood home). I had good memories of working in the family garden with my five sisters, singing songs from Annie, particularly Hard Knock Life, while we were supposed to be weeding, and daring our sister Emma to eat worms (you'll have to ask her if she gave in)!
Beautiful Indiana evening


The first year I planted one hundred strawberries in the rain with my dad, along with some asparagus and rhubarb. Over the winter James and I talked about what seeds we wanted to start and read gardening books for tips. Throughout the spring and summer we would tuck the kids safely in bed, and work in the garden until the sun set. In the quietness of the garden the long days fell away. We talked about life, the kids, and our dreams. The doctors said nerve damage was a slow heal and encouraged me to keep using my arm. The first year I could work in the garden for 10 minutes, the next 30 minutes, the next an hour, and now I can work for quite a long time without problems.

We put a lot of time into our garden, but we've reaped nothing but benefits (and good food)!
Our garden

1. Building family memories- We have so many memories we've created from working together in the garden. I still get made fun of for the time I was digging up potatoes and dug up a nest of baby snakes... I've never jumped so high, screamed so loud, and ran so fast in my life!

2.Communnication- without the blare of the T.V. and distraction of cell phones, the garden is a place where we work and talk about everything as a couple and with our kids.

3. Exercise- gardening burns anywhere from 300-350 calories an hour

4. Healthy Diet- It's easy to eat a lot of fruits and vegetables when they're right outside the door, and the kids are willing to try new veggies if they're excited about growing them!

5. Health Benefits of Organic Food- we've learned to garden without using any type of pesticides, herbicides, and chemical fertilizers. Using compost as a fertilizer adds trace minerals the body needs to fight disease that aren't found in fruits and vegetables that aren't grown in compost.

6. Less Waste- Instead of throwing food into landfills, many food scraps, leaves, grass clippings, and even some paper products can be used for compost, which as I mentioned above is great for your plants and for you!

7. Saving Money- We've learned to save seeds, start seedlings, and preserve our harvest for pennies... and it's all organic, so we save big bucks on our grocery bill.

8. Big flavor- the flavor of veggies from the garden are so much better than the grocery store! If you doubt me, do a tasting party with veggies from the store and veggies from a neighbor who gardens or the farmers market, and see what wins!

9. Community- there's usually an abundance from the garden to be shared with family, friends, neighbors, and for us, even soccer players! You can't share veggies without having a conversation!

10. Mental and Physical Wellbeing- Gardening has been shown to reduce stress and depression. For me, it helped with the muscle and nerve damage from my surgery.

There's nothing like fresh picked veggies

Stories about gardening always catch my attention, but I love it when I hear stories about others who have reaped the benefits of gardening. Several months ago I clipped an article called "Happiness Blooms From Gardening" from My Indiana Home about a man who lost his wife and kids in a tragic accident. After spending five years in depression, he started a flower garden. Now he plants thousands of bulbs every year, and his gardens bring joy not only to him, but to people from all over Indiana who come to see the flowers.

One evening I had the news on and I heard a brief story about astronauts gardening in space. I was fascinated that they weren't just gardening to have an alternate food source, but as a way to reduce stress and fight depression as well!

One of my favorite gardening quotes I've ever heard came from the July 16th episode of Growing a Greener World. Celebrity chef, Graham Kerr, said, "At the same time I'm working, I'm being rewarded by it. It looks great when I have finished, it tastes great when I have finished, and I have more coming up than I can eat that I can give away to people that I care a lot about. What can enjoyment can you get besides singing The Lord's Prayer in the Sistine Chapel?"

Giving credit and extra reading
http://www.my-indiana-home.com/farm/happiness-blooms-through-gardening/
http://modernfarmer.com/2013/09/starship-salad-bar/
http://www.growingagreenerworld.com/episode216/


Wednesday, March 11, 2015

Kitchen Experiment: Homemade Coconut Milk

I was skeptical when I came across a recipe for homemade coconut milk that didn't require any fancy gizmos and used a simple bag of shredded coconut. I gave it a try and my only thought was where have I been and why didn't I make this sooner? It's ridiculously easy to make, it's easy on the wallet, and it has a delicious creamy consistency.  Ready to try it? Here's the recipe!


The Necessities:

2 cups of shredded coconut
1/4 teaspoon of baking soda
2 cups of water

Optional- vanilla and/or cinnamon for flavor


I've tried it with both unsweetened and sweetened coconut, and I like it both ways. If I'm putting it in tea or a smoothie, I'll make it with the sweetened coconut because it's cheaper and it saves me a step because I normally add some sort of sweetener to them anyways.


Bring the water to a simmer and add the coconut.


Let the coconut simmer in the water for 2-3 minutes.


Let the mixture cool off and then blend it for 2-3 minutes. The "let it cool" part is key here, because otherwise you might crack your nice glass blender and make your husband upset, not that I did that or anything...


Place a tea towel, over a strainer, over a measuring cup. . . It's a good idea to keep it in that order.


Pour your mixture into the tea towel.


Let it do its thing. Unless it doesn't want to. Then you might need to work your muscles to squeeze out every last drop of goodness.


As you can see here, I got just under two cups of coconut milk.


Add 1/4 teaspoon of baking soda to the coconut milk. I know it sounds gross, but you actually can't taste it and it keeps the milk from separating. You can also add other flavorings here. If I know I'm going to use it for tea, coffee, or smoothies, I'll add a splash of vanilla or a pinch of cinnamon.


Enjoy! My favorite way to use it is to froth the warm milk with an immersion blender and add it to chai tea for a coconut chai latte- it's the perfect companion for an afternoon of editing. It's also delicious in smoothies, rice, soup, and curry.

Sunday, March 1, 2015

Time to Get Growing- The Soil Blocker

It's March here in Indiana, and although the cold temperatures and snow covered ground don't conjure up the feelings of gardening in the summer sun or picking bright red tomatoes, we realized it's time to start planting- indoors of course!

We love starting our own seeds. And when I say love, I mean LOVE! We love that we can control what kind of soil blend we are growing our seeds in and that we can choose not to use any chemicals on them. We love that we can save money, I mean, what's not to love about saving money, right? It's actually a pretty steep difference. One plant at the store alone can cost around three dollars, so even if you spend three dollars on a packet of seeds, you can still get 20-30 plants for the same price as you could get one!

Not only have we grown a lot of seedlings over the last few years, we've lost many too! It's definitely not very fun to spend weeks babying seedlings only to lose them during the transplanting process. But have no fear! Last year we discovered the superhero of gardening tools- the soil blocker!


Soil blockers make transplanting plants a breeze. Gone are the days of damaging the seedlings as you try to squeeze them out of a plastic container! No longer will your delicate seedling roots have to attempt to grow through a thick peat pot. Once you make your soil blocks and plant your seeds, all you have to do is transfer the block directly to the garden- we're not kidding!


To get started you will obviously need a soil blocker. You can find these online. You will also need to make a special blend of soil, so that your blocks will hold together.


For the soil blend you will need compost, peat moss, perlite, and fertilizer. We used compost from our compost pit, but you can also purchase it in most stores that have a seasonal gardening section.


There are no "exact" measurements. The blend we use is 2 parts peat moss, 1 part compost, 1 part perlite, and a small amount of fertilizer. As you can see above, we used a planter filled to the brim to measure out our parts.


We used around 1/4 cup of organic fertilizer.

 
Mix it all together! (Definitely the best part!)


Moisten with water until you get a pasty consistency.


Press your soil blocker into the soil mixture and wiggle it around so the soil is tightly compacted.


Release the soil blocker on a firm surface.


Viola! The perfect container to grow your seeds in!


Cover the blocks with plastic until they sprout and then place them under grow lights until you can transplant them outdoors!

Sunday, November 16, 2014

Planting Garlic

We did the only proper thing to do on the day before Halloween and planted an entire row of garlic. It's important to keep those vampires at bay on Halloween night! If by chance you don't have any vampires hanging around your house, garlic is still definitely worth planting.

Here's why you should plant it-

First, it's delicious. Second, it's easy to plant. Third, it's delicious. Fourth, it's renowned for it's healing properties. According to Growing Vegetables by Kim Rowney, garlic was used in World War II to dress soldiers wounds and it was said that Roman soldiers ate it to keep their strength up. Today it is considered a disinfectant because of its high sulfur content. Fifth, it's renewable- you can save some of the heads every year to planted the next year. Sixth, garlic is just downright delicious in all kinds of recipes.

You'll want to plant garlic after the first frost when the soil has cooled down. We had early spring peas planted in this bed, planted buckwheat in it as a cover crop over the summer, and then hand-tilled it to get it ready for the garlic this fall.


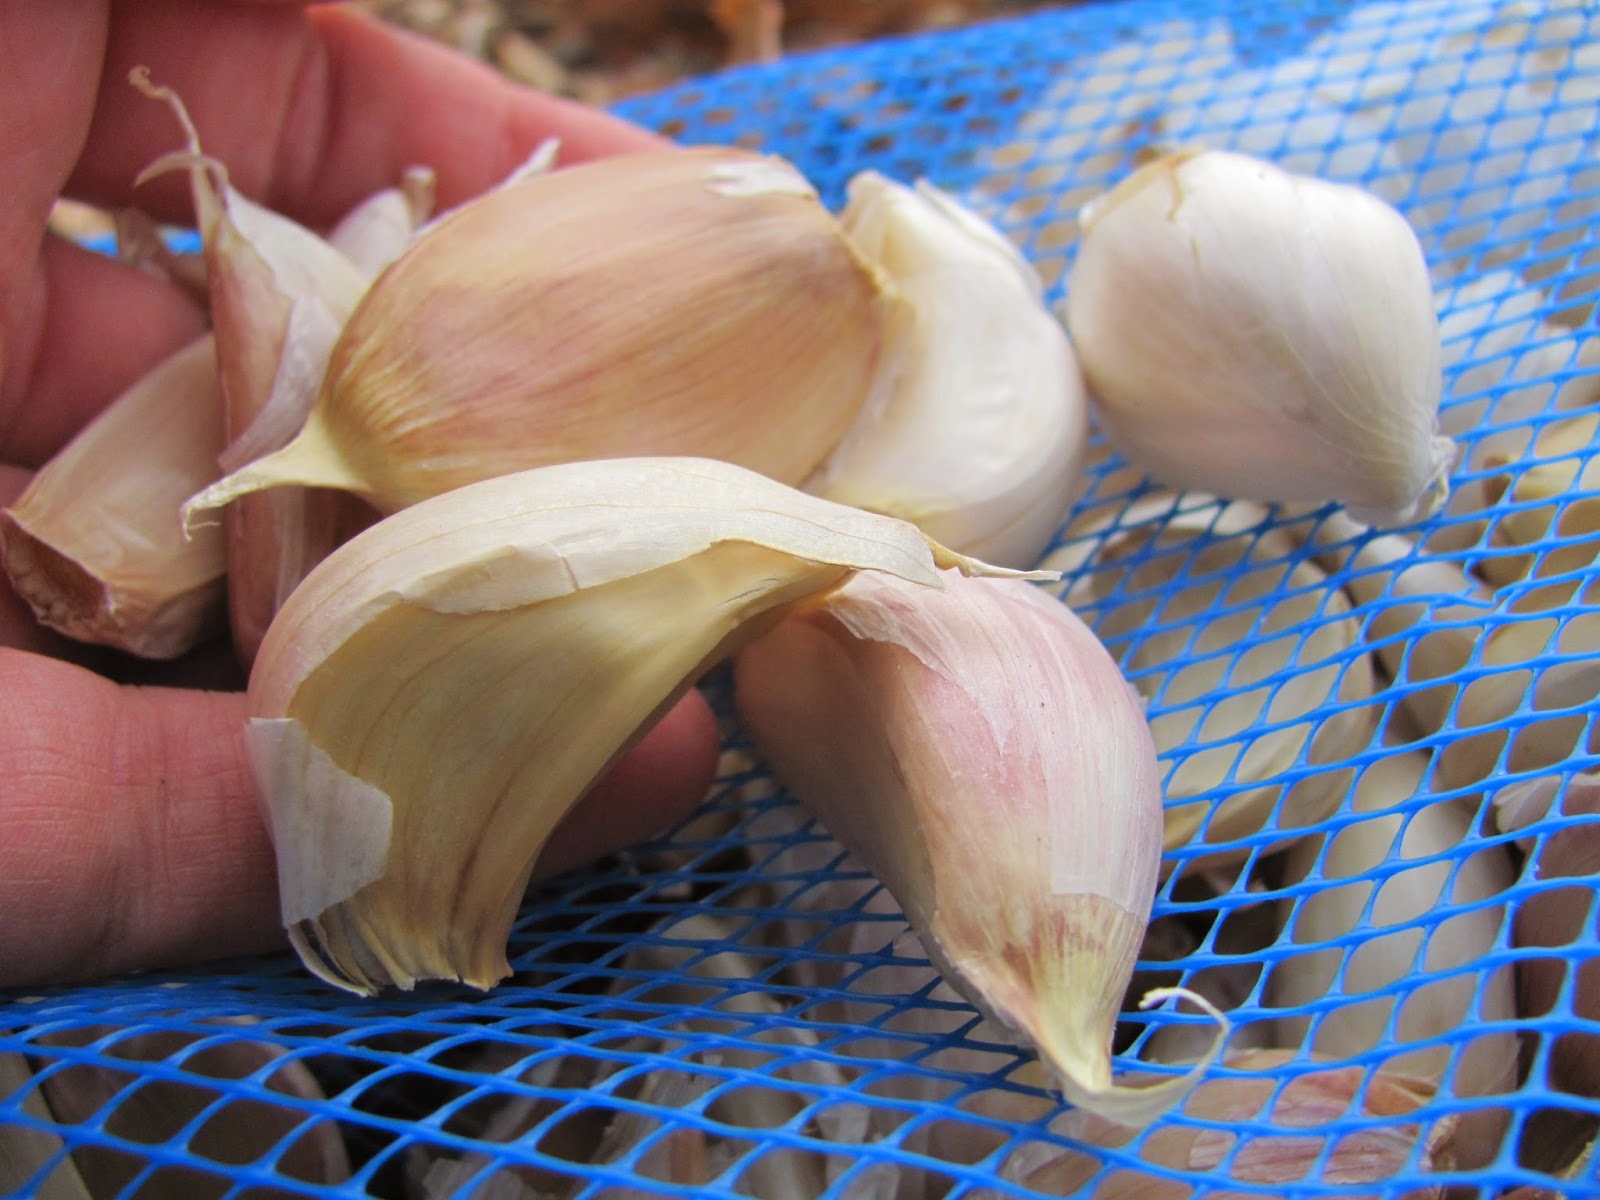
Last year we bought cheap heads of garlic from the garden section of the supermarket that didn't do very well. This year we bit the bullet and bought quality garlic from a garden catalog. There was a vast difference in the cloves. They were huge and plump, instead of like the itty-bitty dried out supermarket variety that looked like it had been sitting in an attic collecting dust for several years. Because we'll be able to save heads of garlic every year after our initial investment, we definitely thought it was worth it!


However, life experience has brought this wonderful garlic tip to you-

Garlic Tip: Check at your local farmer's market for garlic heads from local farmers before you buy them online.

Right after we had received the other garlic in the mail, I was wandering around the farmer's market when I stumbled upon a local Amish family selling none other than these big, beautiful, purple striped heads of garlic. They said they were a German variety called Music that grows heavy bulbs and stores well. Not only were they cheaper, but because they were grown locally, I knew that they would grow well in our Indiana climate.


Aren't the cloves pretty? (It doesn't hurt that it was sooo much cheaper than the garden catalog variety too!)


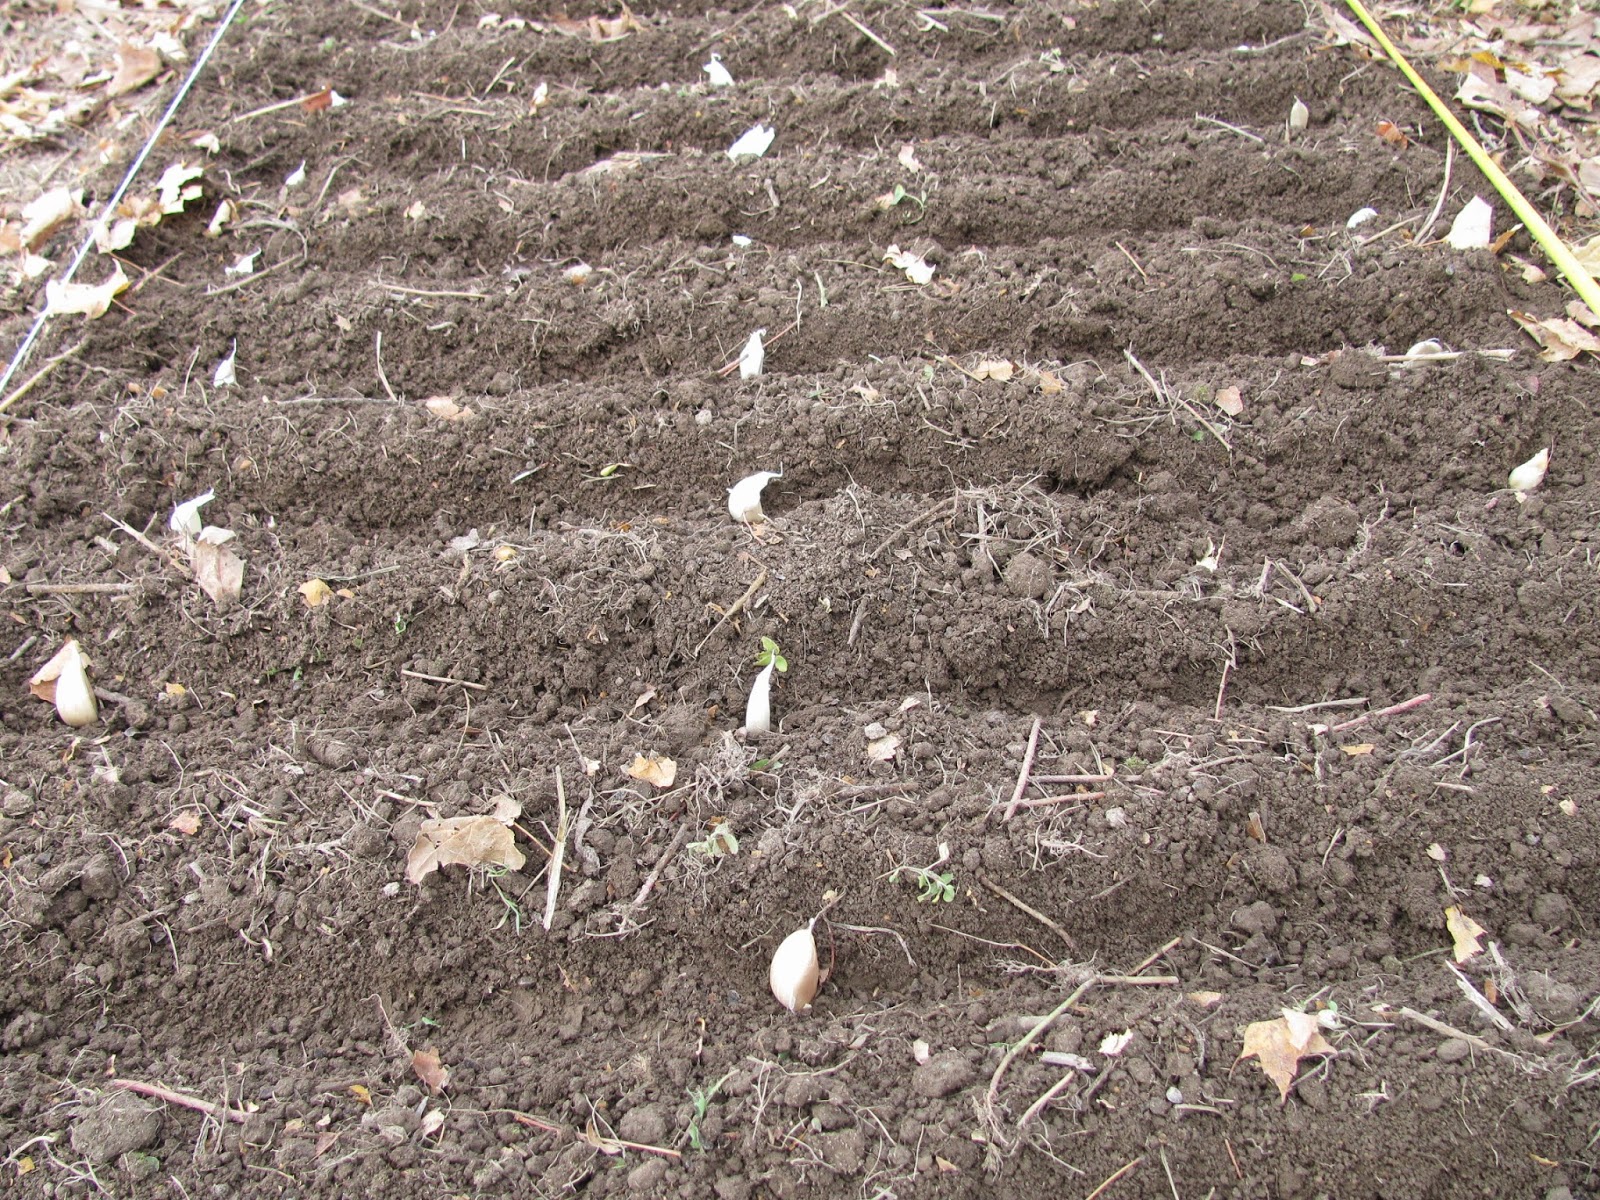
Plant your garlic cloves in rows spaced eight inches apart. In each row your cloves should also be spaced eight inches between one another. (As you can see the garlic cloves in the actual rows are spaced more like ten inches apart- we like to bend the rules.)


You'll want to cover your cloves with two inches of dirt, that's why we have ours tucked into these trenches


After you cover your cloves with dirt, you need to cover them with six inches of mulch to keep them protected over the winter. We applied a nice thick layer of shredded leaves because we had a plethora of them sitting in our yard, they add nutrients to the soil, and you can't beat the lovely fall color!


Small green shoots will come up in the spring, and you'll be able to harvest your garlic early to mid summer depending on the variety.

Thursday, September 11, 2014

Warm Tomato Salad

We can always count on our cherry tomatoes to produce, so I am constantly looking for ways to use them up. This salad was inspired by a dish James and I had in a restaurant one time; the flavors are simple, but boy is it delicious. It also doesn't hurt that it is super easy to put together and looks gorgeous on a plate!

The necessities:

-Your favorite variety of cherry tomatoes
-Fresh garlic
-Olive oil
-Salt and Pepper
-Fresh Basil

Slice your tomatoes in half, or in quarters, whatever suits your fancy, and mince your garlic.


Drizzle 1-2 tablespoons of olive oil in a pan and add your garlic. Cook it for a few minutes and then add your cherry tomatoes. Cook for another 5-6 minutes.You want the tomatoes to be warm, but you also want to retain their firmness.


While your tomatoes are cooking, chop your basil into pretty ribbons.


Pour your tomato and garlic mixture into a dish, sprinkle with salt and pepper, and garnish with the basil. Enjoy!


Tuesday, September 2, 2014

Putting Up Carrots

James' favorite phrase this summer has been, " (insert vegetable) for days." So whenever we are harvesting anything from our garden, he'll say something like, "Carrie, we've got carrots for days, carrots for days." Well, he was dead on. I peeled and processed carrots. For. Days.

Our carrots did abnormally well this summer and we dug up around 50 pounds of carrots.


This is what we had left after peeling for two hours! It took me two days to get them all peeled.


All peeling aside, there's nothing quite as nice as homegrown carrots.


Ready to process.


Thank goodness for our food processor that made easy work of shredding and chopping our carrots!


This thing makes me dance. Any time you can get out of chopping 50 pounds of carrots is a moment that is worth dancing about!


I blanched and froze several bags of carrots. I like to use the shredded carrots to toss into baked goods and the chopped carrots for soups. (Recipes to come!)


If you can can green beans, then you can can carrots!

I used the hot pack method by boiling the carrots in a large stock pot with water for about five minutes. I pulled the jars I had warming in my pressure canner out, put 1/2 teaspoon of salt into each jar, and then poured my hot carrots into them. You will want to leave 1 inch of headspace and remove any air bubbles, so that your lids will seal properly and keep your food from spoiling. Carrots need to be pressure canned at 10 pounds of pressure for 25 minutes (or 30 minutes if you're using quart jars).

I'm not sure how I'll go about using all these canned carrots, but can't wait to pull them out in the dead of winter and start experimenting!